
Nessun prodotto nel carrello.
How to use Block Storage to Increase Space on Your Nextcloud Instance
Overview
In a previous article, I showed you how to build your very own Nextcloud server. In this article, we’re going to extend the storage for our Nextcloud instance by utilizing block storage. To follow along, you’ll either need your own Nextcloud server to extend, or perhaps you can add block storage to a different type of server you may control, which would mean you’d need to update the paths accordingly as we go along. Block storage is incredibly useful, so we’ll definitely want to take advantage of this.
Let’s begin!
Setting up the block storage volume
First, use SSH to log in to your Nextcloud instance:
ssh
If we execute df -h, we can see the current list of attached storage volumes:
df -h
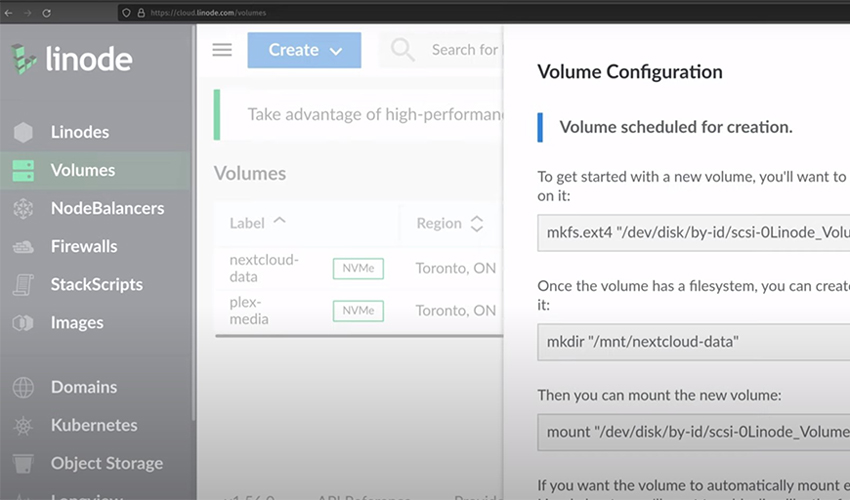
One of the benefits of block storage, is that you can have a smaller instance (but still have a bigger disk). Right now, unless you’re working ahead, we won’t have a block storage volume attached yet, so create one within the Linode dashboard.
You can do this by clicking on “Volumes” within the dashboard, and then you can get started with the process. Fill out each of the fields while creating the block storage device. But pay special attention to the region – you want to set this to be the same region that your Linode instance is in.
After creating the volume, you should see some example commands that give you everything you need to set up the volume. The first command, the one we will use to format the volume, we can copy and paste that command directly into a command shell. For example, it might look similar to this:
sudo mkfs.ext4 “/dev/disk/by-id/scsi-0Linode_Volume_nextcloud-data”
Of course, that’s just an example command, it’s best to use the command provided from the Linode dashboard, so if you’d like to copy and paste – use the command that you’re provided within the dashboard.
At this point, the volume will be formatted, but we’ll need to mount it in order to start using it. The second command presented in the dashboard will end up creating a directory into which to mount the volume:
sudo mkdir “/mnt/nextcloud-data”
The third command will actually mount the new volume to your filesystem. Be sure to use the command from the dashboard, the one below is presented only as an example of what that generally looks like:
sudo mount “/dev/disk/by-id/scsi-0Linode_Volume_nextcloud-data”
Next, check the output of the df command and ensure the new volume is listed within the output:
df -h
Next, let’s make sure we update /etc/fstab for the new volume, to ensure that it’s automatically mounted every time the server starts up: